Simple Squirrel Painting
Easy Watercolor Painting Ideas: Painting a Squirrel is an exciting and beginner-friendly project that allows you to explore your artistic skills while capturing the charm of woodland creatures. In this tutorial, we’ll guide you through the easy steps to create your own watercolor squirrel masterpiece.
Fun fact: Did you know that squirrels use their bushy tails to communicate? Just like adding subtle details to your painting, these characteristics bring them to life.
Watercolor painting is one of the most rewarding and satisfying art forms for beginners. Its fluidity and vibrant colors make it a favorite medium for artists of all levels. Today, I am excited to take you through the step-by-step process of creating a cute squirrel painting.
Whether you are new to art or looking to refine your skills this easy watercolor painting project is perfect for you.
Follow our step-by-step guide
Step – 1: Initial Sketch
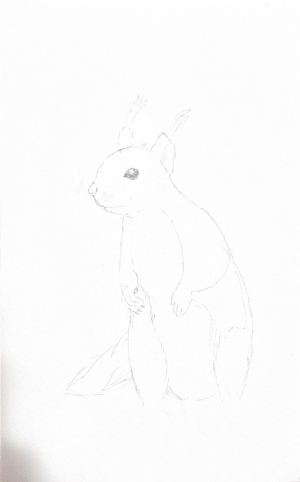
This is how we begin, an outline of the squirrel drawn with light pencil strokes. Keeping the sketch simple and clean helps lay the groundwork for the painting while allowing room for adjustments during the painting process.
I lightly outlined the squirrel, focusing on its distinct shape and posture. The key here is to keep the lines light and minimal so they blend seamlessly under watercolor layers.
If you’re not confident with freehand sketching, don’t hesitate to use a reference photo or a grid method for accurate proportions.
Step – 2: Adding base colors

Once the outline was complete, I started applying the base colors. For the squirrel’s body and tail, I chose earthy tones like burnt sienna and raw umber, and for the grass background, I opted for soft greens to represent a natural setting.
The magic starts to unfold with the addition of base watercolor layers. Using soft, earthy tones, the squirrel begins to come to life. At this stage, focus on layering the lightest hues and creating smooth transitions between colors.
To achieve smooth transitions, I diluted the paint with water, creating a transparent effect. This stage is all about laying down the groundwork.
Step – 3: Detailing and Textures

The painting comes alive as details and textures are added to the fur, tail, and surroundings. Precise brushwork and color variations bring depth and realism, while highlights and shadows make the squirrel pop off the page and become lively.
I used saffron orange color to highlight hands and fur ends on the belly.
Raw umber was used for giving darker shade to the body.
For the eyes, ear and nose, I used darker pigments (Raw umber and Black) to enhance contrast, bringing out the squirrel’s expressive features.
Prior to adding details, always wait for the base layer to dry. This helps keep your painting sharp and stops colors from fading.
Step – 4: Finished Masterpiece
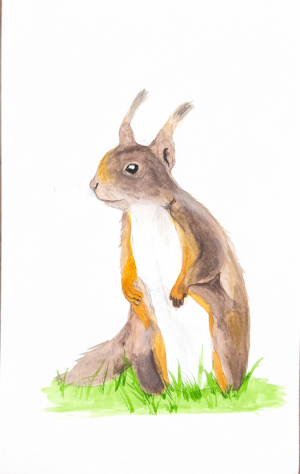
Here is the completed painting, a vibrant squirrel brought to life with layers of colors, intricate details, and expressive brushstrokes. The surrounding grass add the final touches to create a lively and harmonious composition.
The surrounding grass were detailed with varying shades of green to create a harmonious composition.
If you want your artwork to appear three-dimensional, you must use highlights. For best effect, use them carefully and sparingly.
Materials Used
Watercolor Paper – 5.5 x 8.5 inches – 200 GSM
Watercolor Palette
- Saffron Orange
- Taupe
- Burnt Sienna
- Raw Umber
- Titanium White
- Sap Green
Synthetic Round Brushes (Size 2, 4)
Pencil for sketching
Colors Used: Arteza Colors
Bonus YouTube Video on – Easy Watercolor Painting Ideas – Squirrel painting step by step
Subscribe to my channel, if you want to try this beginner watercolor squirrel painting
By following these steps, you’ll not only create a beautiful painting but also gain confidence in your artistic journey. Start experimenting today and watch your creativity soar!
For more easy watercolor painting ideas or personalized advice, feel free to reach out via the Contact Us page on this site.
Happy Painting!
Easy steps to learn painting
Very nice